1. eMMC 부트 방지 점퍼 제거
- CM5의 eMMC는 기본적으로 부팅을 방지하기 위해 점퍼로 설정됨
- Raspberry Pi Imager로 OS를 설치한 후에는 점퍼를 제거해야 정상 부팅 및 HDMI 출력이 가능
2. rpiboot 설치 및 Mass Storage 모드 진입
PC에서 라즈베리파이의 eMMC를 장치로 인식하기 위해 rpiboot를 설치 rpiboot는 라즈베리파이를 PC에서 인식하고 사용할 수 있게 함(일종의 디바이스 드라이버 프로그램)
- rpiboot 설치
- CM5를 PC에 USB로 연결한 후,
rpiboot-CM4-CM5 - Mass Storage Gadget을 실행하면 eMMC가 USB Mass Storage 디바이스로 인식됨
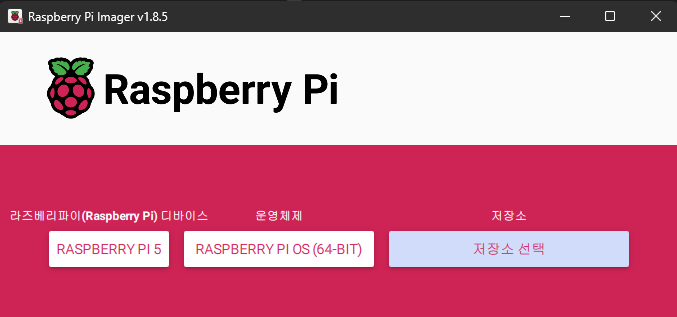
3. Raspberry Pi OS 설치
Raspberry Pi OS 64bit 설치
- Raspberry Pi Imager 설치 및 실행
- Raspberry Pi OS 64bit 선택 후 설치
- MMC/BLK0 USB DEVICE 선택
설치가 완료되면 점퍼를 제거한 뒤 재부팅하고, HDMI를 통해 화면이 정상 출력되는지 확인
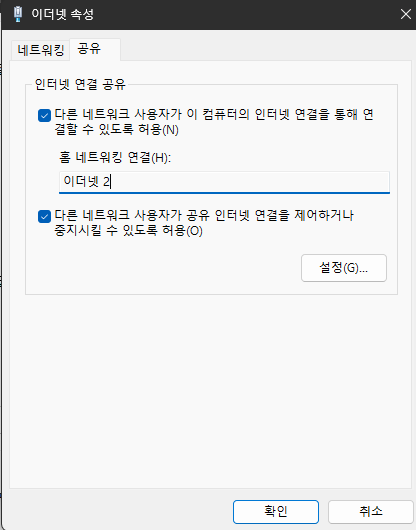
4. Ethernet 직접 연결 설정 (Windows PC 기준)
CM5를 USB-Ethernet 어댑터를 통해 Windows PC에 직접 연결
1) 제어판에서 ICS 설정
Windows에서 기존 인터넷 연결 어댑터에 대해 인터넷 연결 공유(ICS)를 설정 → Ethernet을 통해 라즈베리파이에 네트워크를 전달
2) Raspberry Pi 어댑터 설정
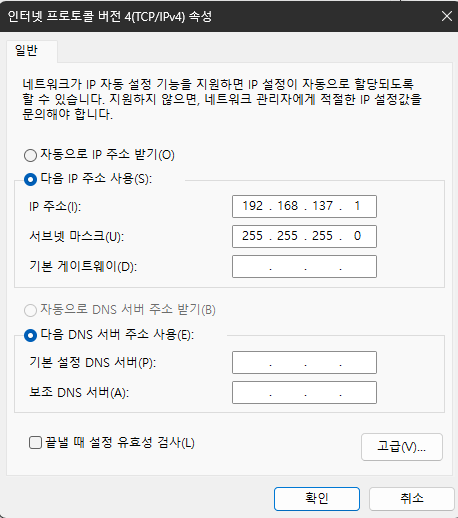
라즈베리파이에는 자동으로 192.168.137.xxx 대역의 IP가 할당됨
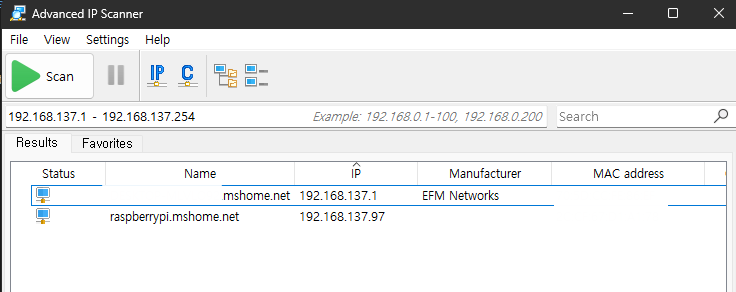
5. IP 확인 및 SSH 접속
IP 확인 툴
- Advanced IP Scanner 사용 시, 라즈베리파이의 IP를 확인 가능
- 또는
raspberrypi.mshome.net이라는 도메인으로 자동 할당됨
SSH 접속 (Key 인증 기반)
ssh terry@raspberrypi.mshome.net
또는
ssh pi@192.168.137.xxx
Note: 기본 사용자명은
pi입니다. 별도로 계정을 만들었다면 그 계정을 사용
6. SSH 설정 변경 (선택 사항)
SSH 설정을 직접 편집하려면 다음 명령을 수행:
sudo apt-get update
sudo apt-get install vim
sudo vim /etc/ssh/sshd_config
sudo systemctl restart ssh
필요한 설정:
PermitRootLogin noPasswordAuthentication no(Key 인증만 사용 시)